Quick Start
From zero to your first research deliverable in five minutes.
Prefer video setup? Watch the YouTube tutorial.
Beginner path: install, run sciclaw app, connect a provider, then pair Telegram/Discord in the wizard.
Advanced path: use Installation, then jump to Configuration, CLI Reference, and Service.
1. Install
Follow Installation for the maintained install commands (Homebrew, binary, or source). Install commands live there so this page stays consistent as release channels evolve.
2. Initialize (app recommended)
# Recommended: opens the dashboard and starts first-run setup
sciclaw app

# CLI alternative for headless/non-TUI environments
sciclaw onboard
Both paths create your config and workspace. sciclaw app starts the same setup wizard inside the dashboard.
3. Connect an AI provider
The wizard asks you to choose a provider. Pick whichever you have. For CLI auth commands and full provider details, see Authentication.
 Setup: Authentication
╭──────────────────────────────────────────────────────╮
│ ✓ Configuration file created.                        │
│                                                       │
│ Choose your AI provider:                              │
│                                                       │
│ [Enter]  Log in with OpenAI (recommended)             │
│ [a]      Use Anthropic API key                        │
│ [Esc]    Skip for now                                │
╰──────────────────────────────────────────────────────╯
                    Step 2 of 5
- OpenAI (press Enter) — Uses ChatGPT Plus, Team, or Enterprise via device-code login. No API key needed.
- Anthropic (press
a) — Paste an Anthropic API key from console.anthropic.com.
After connecting, the wizard runs a quick smoke test to confirm everything works:
╭──────────────────────────────────────────────────────╮
│ ✓ Configuration file created.                        │
│ ✓ Connected!                                         │
│                                                       │
│ Your AI responded:                                    │
│ │ Hello! I'm ready to help with your research.        │
│                                                       │
│ Press Enter to continue.                              │
╰──────────────────────────────────────────────────────╯
4. Finish setup
The wizard continues with optional steps — connecting a chat app (Telegram or Discord) and installing the background gateway service. You can skip these with Esc and set them up later. When the wizard finishes, you land on the Home dashboard.
5. Try it — write an abstract
Switch to the Chat tab (press Tab once) and type your first request:
> Search PubMed for papers on TDP-43 proteinopathy in ALS
  published in the last 5 years. Then write a 250-word
  structured abstract summarizing the key findings and save
  it as abstract.docx in my workspace.
sciClaw will:
- Search PubMed using the built-in
pubmed-clitool - Retrieve and analyze relevant papers
- Draft a structured abstract with citations
- Save it as a Word document at
~/sciclaw/abstract.docx
Open the .docx file in Word or Google Docs to review. That's it — you have a working paired-scientist assistant.
Connect a chat app so you can message sciClaw from Telegram or Discord instead of the terminal. See the Onboarding Wizard or Chat Channels for details. For CLI power-user workflows, see CLI Reference.
Installation
Get sciClaw running in minutes. Choose the method that fits your workflow.
Prerequisites: install Homebrew
If you don't already have Homebrew, install it first. Open Terminal (macOS) or your shell (Linux) and paste:
/bin/bash -c "$(curl -fsSL https://raw.githubusercontent.com/Homebrew/install/HEAD/install.sh)"Follow the on-screen prompts. When it finishes, confirm Homebrew is available:
brew --versionStep 1 — Install sciClaw
Add the sciClaw tap and install the package:
brew tap drpedapati/tap && brew install sciclawThis installs sciclaw as the primary command and picoclaw as a compatibility alias. Homebrew also installs companion tools used by built-in skills (including irl, pandoc, rg, uv, docx-review, and pubmed-cli) as dependencies.
sciclaw.dev is the website and docs. drpedapati/sciclaw is the source repo and release binary origin. drpedapati/tap is the main Homebrew tap for sciclaw, sciclaw-dev, irl, and the sciclaw-* companion formulas. drpedapati/tools is the separate Homebrew tap for standalone utilities like docx-review, pubmed-cli, pdf-form-filler, and phi-cleaner.
If you still have the deprecated legacy tap installed, remove it to avoid ambiguity: brew untap drpedapati/sciclaw.
Step 2 — Initialize (app or onboard)
# Recommended: opens dashboard + starts setup wizard
sciclaw app

# CLI alternative
sciclaw onboard
Both commands run the same first-time setup flow. It creates your config (~/.picoclaw/config.json), workspace directories (~/sciclaw/ with memory/, skills/, sessions/, cron/), starter template files, and the baseline science skill pack. On Linux it also bootstraps a managed workspace Python venv at ~/sciclaw/.venv (prefers uv, falls back to python3 -m venv) and installs required packages used by scientific workflows. Then it asks optional questions:
- OpenAI login — Uses device-code login for ChatGPT Plus, Team, or Enterprise (a link opens in your browser). Skip this if you plan to use a different provider.
- Chat smoke test — If authentication succeeds, a single test message is sent automatically to confirm your AI provider is connected and responding.
- PubMed API key — An NCBI API key removes rate limits on literature searches. Recommended but not required; you can add one later.
- TinyTeX — If Quarto is installed, offers to install TinyTeX (~250 MB) for PDF rendering. Skipped automatically when Quarto is not detected.
- Messaging apps — Optionally pairs Telegram, Discord, and/or Slack so you can chat with sciClaw from a messaging app instead of the terminal.
Every prompt defaults to “no”, so you can press Enter to skip anything and come back later. Running sciclaw onboard again is safe — it preserves existing settings and credentials.
If you prefer a non-interactive install (e.g. in a script), use sciclaw onboard --yes to accept all defaults and skip the wizard.
Step 3 — Doctor
sciclaw doctordoctor checks that everything is wired up correctly: it verifies the config directory exists, all companion tools are reachable on your PATH, skill definitions are valid, and your shell environment is ready. If anything is missing or misconfigured it prints a clear explanation and suggested fix.
Finally, confirm the installed version:
sciclaw --versionOn Linux, the tap also installs Quarto for reproducible manuscript rendering. On macOS, install Quarto via brew install --cask quarto. Stable releases auto-update via the GitHub release workflow.
PDF & Quarto Setup
Quarto handles rendering, but PDF output requires a TeX distribution. The onboard wizard can install TinyTeX automatically where Quarto supports it.
If TinyTeX auto-install is unavailable (for example, Linux ARM), install TeX manually:
sudo apt-get update
sudo apt-get install -y texlive-xetex texlive-fonts-recommended texlive-latex-extra
Then verify Quarto + PDF toolchain:
quarto checkDownload a binary
Pre-compiled binaries for Linux (amd64, arm64, riscv64), macOS (arm64), and Windows (amd64) are available on the releases page.
Install from source
git clone https://github.com/drpedapati/sciclaw.git
cd sciclaw
make deps

# Build for your platform
make build

# Or build and install to ~/.local/bin
make installsciClaw is a Go binary. Building from source requires Go 1.25+ and make.
Updating
Keep sciClaw and its components current.
sciClaw is distributed as a single binary with two bundled sub-components: the IRL runtime (Idempotent Research Loop) and baseline scientific skills. How you update depends on how you installed.
Homebrew (recommended)
If you installed via Homebrew, a single command updates sciClaw and all its dependencies, including the IRL runtime:
brew upgrade sciclawThis pulls the latest formula from the drpedapati/tap tap, rebuilds the binary, and upgrades the irl dependency if a newer version is available.
Note: on macOS, Quarto is typically installed via a Homebrew cask, so update it separately with brew upgrade --cask quarto.
To check what version you're running before and after:
sciclaw --version
sciclaw status
Binary releases
If you installed from a downloaded binary, replace it with the latest from the releases page. The IRL binary must be updated separately — download it from the IRL releases page and place it on your PATH.
From source
cd sciclaw
git pull
make deps
make install
This rebuilds and reinstalls to ~/.local/bin. For IRL, pull and rebuild its repo separately.
Updating skills
Baseline scientific skills are installed during sciclaw onboard and live in ~/sciclaw/skills/ by default. They are not automatically updated when you upgrade the binary. To refresh them to the latest built-in versions:
# Re-install all built-in skills (overwrites existing)
sciclaw skills install-builtin

# Or re-run onboard to refresh workspace templates + skills
sciclaw onboard
Third-party skills installed from GitHub can be updated by re-installing them:
# Re-install a GitHub skill to get the latest version
sciclaw skills install username/repo/skill-name
Updating configuration
New sciClaw versions may add config fields (like reasoning_effort). Your existing config.json continues to work — new fields use sensible defaults when absent. To see what's available, compare with the default config:
# View current config
sciclaw status

# Check model and provider details
sciclaw models status
Verifying the update
After updating, verify all components are working:
# Check version
sciclaw --version

# Check all components: config, workspace, providers, IRL runtime
sciclaw status

# Verify skills are loaded
sciclaw skills list

# Quick smoke test
sciclaw agent -m "Hello, what version are you?"| Component | Updated by | Location |
|---|---|---|
sciclaw binary | brew upgrade sciclaw | $(brew --prefix)/bin/sciclaw |
irl runtime | brew upgrade sciclaw (dependency) | $(brew --prefix)/bin/irl |
quarto (optional) | macOS: brew upgrade --cask quarto / Linux: brew upgrade sciclaw (dependency) | $(brew --prefix)/bin/quarto |
| Baseline skills | sciclaw skills install-builtin | ~/sciclaw/skills/ |
| Config file | Manual or sciclaw models set | ~/.picoclaw/config.json |
| Workspace templates | sciclaw onboard | ~/sciclaw/ |
TUI Interface
A visual dashboard for managing sciClaw without typing CLI commands.
Launch the app:
sciclaw appThe interface opens in your terminal with a tabbed layout. Use Tab / Shift+Tab to switch between tabs, arrow keys to navigate within a tab, and q to quit. There are 13 tabs: Home, Chat, Channels, Routing, Users, Models, PHI, Skills, Schedule, Gateway, Settings, Login, and Health.
On first launch the TUI detects that setup is incomplete and automatically starts the onboarding wizard.
Onboarding Wizard
The wizard walks through five steps. Every step can be skipped with Esc and revisited later from the Settings or Login tabs.
Step 1 — Welcome
The opening screen confirms you’re about to start setup.
Step 2 — Authentication
Choose an AI provider. OpenAI device-code login works with ChatGPT Plus, Team, or Enterprise — no API key needed. You can also enter an Anthropic API key directly.
After logging in, the wizard runs a quick smoke test. If successful, you see the AI’s first reply:
Step 3 — Chat Channel
Optionally connect a messaging app so you can talk to sciClaw from Telegram or Discord instead of the terminal. The inline wizard collects the bot token, your user ID, and an optional display name.
Step 4 — Gateway Service
The gateway runs sciClaw as a background service so it stays connected to your chat channels even when the TUI is closed.
Step 5 — All Set
A final checklist confirms what was configured. Press Enter to close the wizard and enter the Home dashboard.
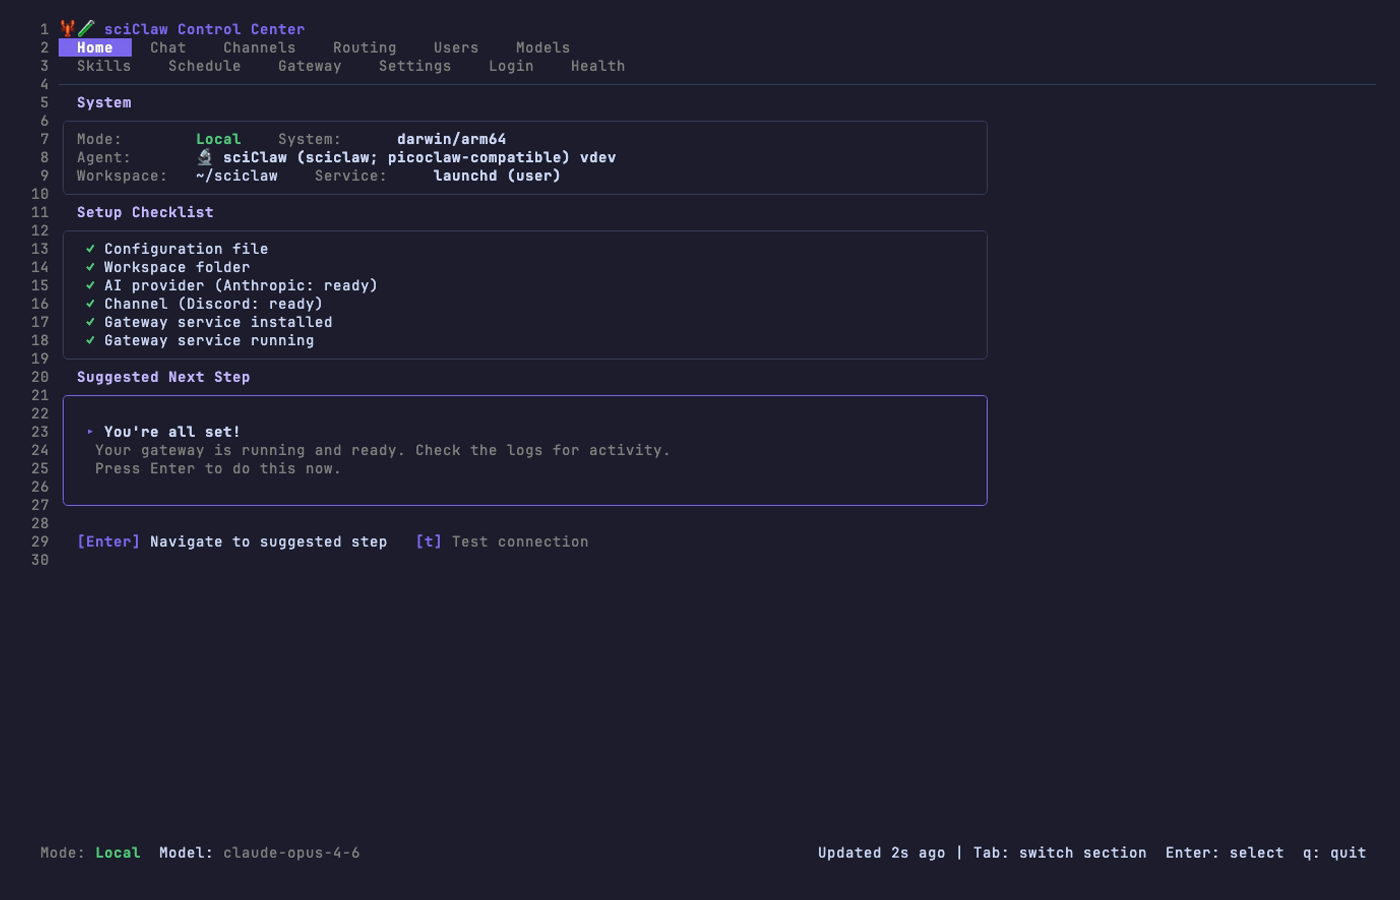
Home Dashboard
After setup completes (or on subsequent launches), the Home tab shows three panels: System info (mode, version, workspace), a Setup Checklist with green/orange/red status icons, and a Suggested Next Step with a one-click fix when something needs attention.
Press [t] to test the AI connection. If any checklist item shows ! or ✗, the Suggested Next Step panel highlights a fix. Press Enter to apply it.
Channels Tab
View and manage your connected messaging apps. Both Discord and Telegram are shown on the same screen. Use [a] to add approved users, [d] to remove, and [s] to reconfigure a channel’s bot token.
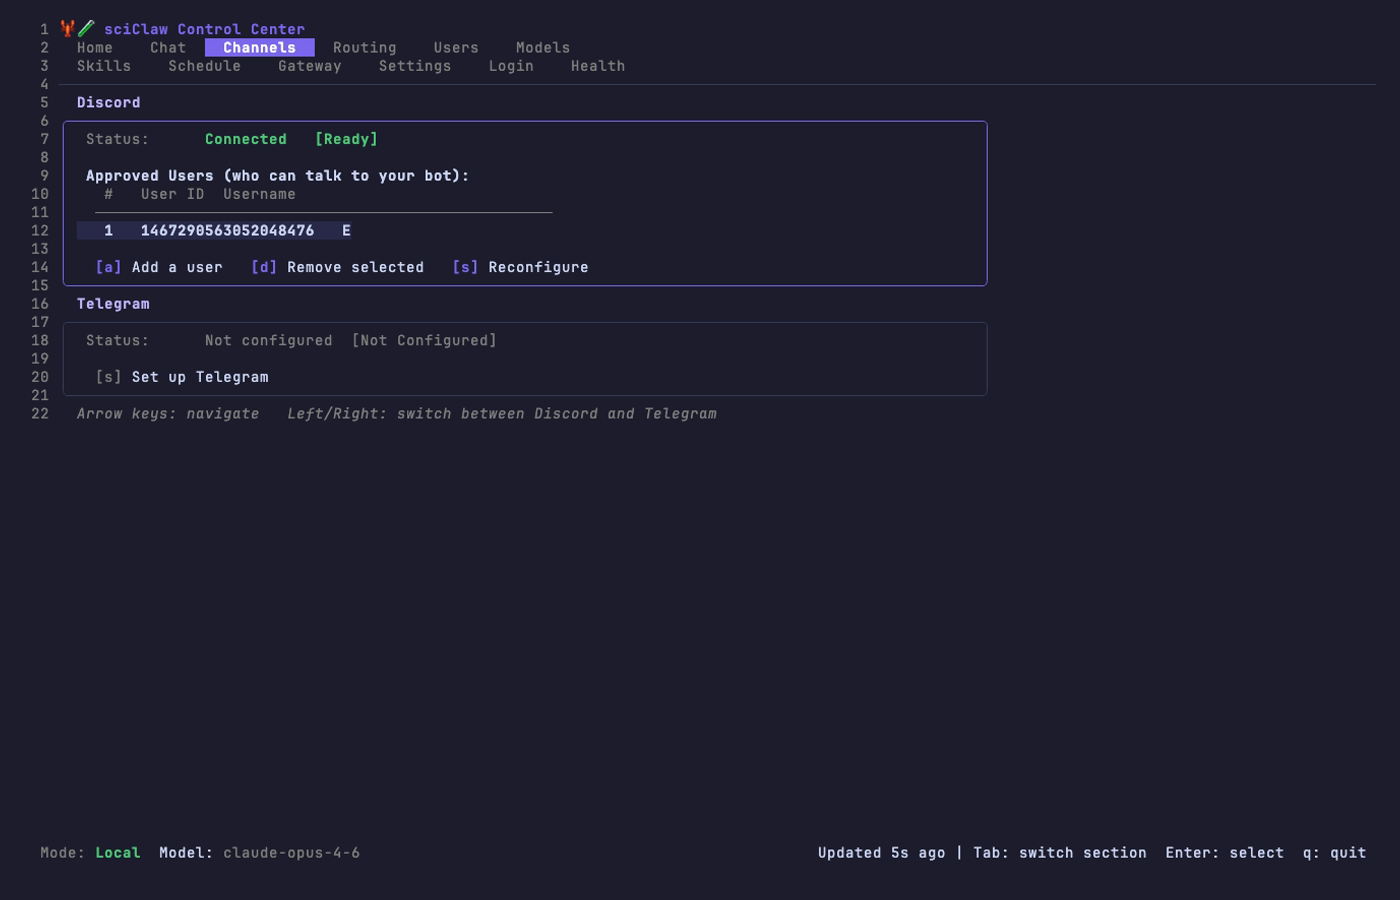
Adding a user requires only their numeric user ID (right-click their profile in Discord or Telegram to copy it) and an optional display name.
Routing Tab
Map chat rooms to project folders so each conversation sees only its own data. The routing tab shows the current status, a list of all mappings, and details for the selected mapping.

The [a] Add wizard walks you through selecting a channel, chat room, workspace folder, allowed users, and a label — six steps total. Use [m] to choose AI mode for a room (default/cloud/local PHI), [f] to edit a folder, [u] to edit users, and [R] to apply changes. The gateway hot-reloads automatically.
For most teams: keep rooms in default mode, then set only privacy-sensitive rooms to PHI (local) with [m]. This gives you cloud speed where you want it, and local privacy where you need it.
PHI Tab
Manage local Qwen runtime from one screen. This tab lets you switch global mode (cloud vs PHI), run one-click PHI setup, choose a local model, and pull/update model weights without leaving the TUI.
Use [p] for setup, [g] to switch to global PHI mode, [c] to switch back to cloud, [2]/[4]/[9] for Qwen size presets, [m] for a custom model tag, [i] to install Ollama, [o] / [x] to start or stop the Ollama service, and [d] to pull the selected model.
Settings Tab
View and toggle all configuration options from a single screen. Navigate with arrow keys, press Enter to toggle or edit a value.
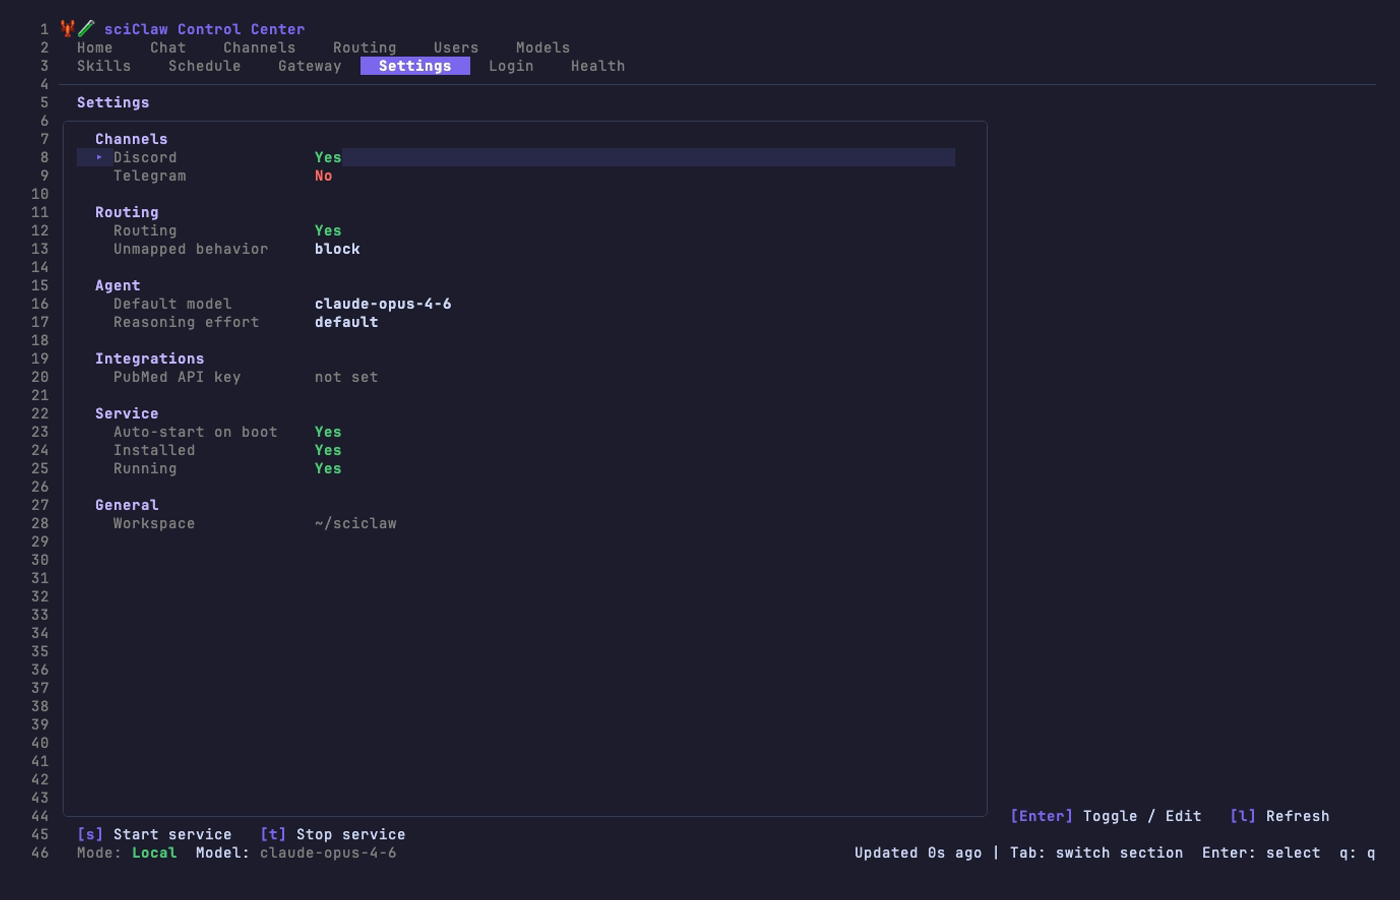
Settings are grouped into sections: Channels, Routing, Agent (model and reasoning effort), Integrations (PubMed API key), Service, and General. Service controls ([s] start, [t] stop) are available directly from this tab.
Web Interface
A browser-based dashboard for managing sciClaw. Same capabilities as the TUI, accessible from any device on your network.
Gateway vs Web Server
This is the most common source of confusion for new users, so here’s a clear breakdown:
| Process | What it does | Command | Default port | Service name |
|---|---|---|---|---|
| Gateway | Connects to Discord/Telegram, processes messages, runs the AI agent loop | sciclaw gateway |
None (connects outbound to chat APIs) | sciclaw-gateway.service |
| Web Server | Serves the browser dashboard for configuration, monitoring, and file editing | sciclaw web |
4142 |
sciclaw-web.service |
Both are installed as background services with sciclaw service install. You can check their status independently:
sciclaw service gateway status
sciclaw service web status
The web server reads the same config.json and workspace files as the gateway, but it does not process chat messages or run the agent loop.
Accessing the Web UI
How you access the web UI depends on where sciClaw is running:
Same machine (localhost)
If you’re sitting at the machine running sciClaw, open a browser to:
http://localhost:4142Another machine on your local network
By default, the web server binds to 127.0.0.1 (localhost only) for security. To access it from another machine on your LAN or VPN:
Option 1 — Bind to all interfaces (simplest, use when on a trusted network like ZeroTier):
# Stop the default service
systemctl --user stop sciclaw-web

# Edit the service to listen on all interfaces
systemctl --user edit sciclaw-web --force

# Add this content:
[Service]
ExecStart=
ExecStart=/home/linuxbrew/.linuxbrew/bin/sciclaw web --listen 0.0.0.0:4142

# Reload and restart
systemctl --user daemon-reload
systemctl --user start sciclaw-web
Then access from any machine on the same network using the server’s IP:
http://<server-ip>:4142Option 2 — SSH tunnel (more secure, no config changes needed):
# Run this on your laptop/desktop:
ssh -L 4142:127.0.0.1:4142 your-server

# Then open in your browser:
http://localhost:4142
The tunnel forwards your local port 4142 to the server’s localhost:4142 through SSH. No firewall changes needed.
Option 3 — Cloudflare Tunnel (for access from anywhere):
If your server already has a Cloudflare Tunnel (cloudflared), add a route for the web UI. This gives you HTTPS access from any browser without exposing ports.
System Tab
The System tab provides a transparent view of all workspace personality files that shape how your sciClaw agent behaves. These are the markdown files in your workspace root: AGENTS.md, SOUL.md, USER.md, IDENTITY.md, TOOLS.md, HOOKS.md, and memory/MEMORY.md.
What you can do
- View the full content of any file
- Edit files directly in the browser and save changes
- Compare your local file against the release template to see what you’ve customized
- Reset any file to the default template with one click
- Switch workspaces if you have routing-specific workspaces configured
File status badges
- Current — Your file matches the release template exactly
- Customized — Your file has been modified from the template
- Missing — The file does not exist in your workspace
This tab is especially useful after upgrading sciClaw, since the release may include updated templates. You can diff your local files against the new templates and decide whether to merge the changes or reset to defaults.
Routing Tab
The web UI includes a routing wizard for adding and managing channel-to-workspace mappings. It provides a Discord channel picker and directory browser so you can configure routing without touching the CLI.
Adding a mapping
Click Add Mapping to open the wizard. Select a channel type, pick a chat room, choose a workspace folder, and optionally specify allowed senders. If you leave the allowed-senders field empty, the backend defaults to --allow * (all senders permitted).
Scientist Setup Guide
The intended workflow for non-technical scientific users: chat in Telegram/Discord, keep an auditable workspace.
What this feels like
You talk to sciClaw in your normal chat app. sciClaw proposes a plan, runs tools, and writes evidence and drafts into a visible workspace folder. You review outputs and iterate.
Recommended setup (Telegram)
- Complete Quick Start first (install + initialize + provider auth): Quick Start
If you skipped provider login during setup, use Authentication to connect OpenAI or Anthropic before pairing chat channels.
- Pair Telegram (writes an allowlist so only you can talk to the bot)
sciclaw channels setup telegram- Start the gateway (background mode recommended for daily use)
# Background mode
sciclaw service install
sciclaw service start

# Foreground mode
sciclaw gatewayWorkspace (visible): ~/sciclaw/ (sessions, evidence, skills, hooks, IRL audit logs).
Config + auth (hidden): ~/.picoclaw/config.json and ~/.picoclaw/auth.json (secrets and provider credentials).
Telegram only allows one gateway instance per bot. If you run multiple instances you will see a 409 conflict. Stop the other instance, then restart the active mode (sciclaw service restart or sciclaw gateway).
Discord instead of Telegram
Discord setup is also first-class:
sciclaw channels setup discord
sciclaw service install
sciclaw service start
Discord requires enabling MESSAGE CONTENT INTENT in the Developer Portal.
Keep it up to date
brew upgrade sciclaw
sciclaw doctor
If doctor reports missing companion tools (docx-review, pubmed-cli, IRL, ripgrep), install via Homebrew or follow the install hints in the report.
Configuration
All settings live in ~/.picoclaw/config.json.
The config file controls agent defaults, provider credentials, channel integrations, tool settings, and heartbeat behavior. A complete example is shipped at config/config.example.json in the repository.
{
  "agents": {
    "defaults": {
      "workspace": "~/sciclaw",
      "model": "gpt-5.2",
      "reasoning_effort": "high",
      "max_tokens": 8192,
      "temperature": 0.7,
      "max_tool_iterations": 0
    }
  },
  "providers": { ... },
  "channels": { ... },
  "tools": {
    "web": {
      "brave": {
        "enabled": true,
        "api_key": "YOUR_BRAVE_API_KEY",
        "max_results": 5
      },
      "duckduckgo": {
        "enabled": true,
        "max_results": 5
      }
    },
    "pubmed": {
      "api_key": "YOUR_NCBI_API_KEY"
    }
  },
  "heartbeat": {
    "enabled": true,
    "interval": 30
  }
}
max_tool_iterations: 0 means no fixed iteration cap; set a positive number if you want a hard stop.
Providers
sciClaw supports multiple LLM providers. Configure one or more in the providers section.
| Provider | Purpose | Auth |
|---|---|---|
openrouter | LLM — access to all models | API key |
anthropic | Claude direct | API key or sciclaw auth login |
openai | GPT direct (gpt-5.5, gpt-5.2) | API key or device-code OAuth |
azure | Azure OpenAI Service | API key (api-key header) |
gemini | Gemini direct | API key |
zhipu | GLM models, best for Chinese users | API key |
deepseek | DeepSeek direct | API key |
groq | Fast inference + voice transcription | API key |
Groq provides free voice transcription via Whisper. When configured, Telegram voice messages are automatically transcribed.
Azure OpenAI Service
To use an Azure-hosted OpenAI deployment, set api_base to the full deployment endpoint URL (including the API version). Azure uses a different auth header (api-key instead of Authorization: Bearer) and sends requests to the URL as-is without appending /chat/completions.
"azure": {
  "api_key": "your-azure-api-key",
  "api_base": "https://YOUR-RESOURCE.openai.azure.com/openai/deployments/YOUR-DEPLOYMENT/chat/completions?api-version=2024-12-01-preview"
}
Then set the model to route through Azure:
"agents": {
  "defaults": {
    "model": "azure/your-deployment-name",
    "provider": "azure"
  }
}
Authentication
sciClaw does not endorse any specific LLM provider. We document multiple options so you can choose what works for your institution, budget, and compliance requirements. A ChatGPT Plus, Team, or Enterprise subscription is the easiest way to get started because it requires no API key management — just log in with your existing OpenAI account. API key workflows (OpenRouter, Anthropic, Azure, etc.) are equally supported for users who prefer them.
Anthropic has two practical paths today: direct API keys, or a Claude.ai oat-token bridge on current dev builds when you authenticate with sciclaw auth login --provider anthropic. Use the path that matches your institution’s policy and deployment constraints.
Easy login: OpenAI device code (ChatGPT Plus/Team/Enterprise)
If you have a ChatGPT Plus, Team, or Enterprise subscription, the fastest path is device-code login. No API key needed — sciClaw authenticates directly with your OpenAI account:
sciclaw auth login --provider openaiThis opens a link and gives you a short code. Open https://auth.openai.com/codex/device in any browser, enter the code, and approve access. sciClaw receives an OAuth token tied to your subscription — no keys to copy or rotate.
Device-code flow (RFC 8628) is designed for CLI tools and headless environments. sciClaw requests a one-time code from OpenAI, you verify it in your browser, and sciClaw polls until you approve. Tokens refresh automatically. This is the same flow used by the OpenAI Codex CLI.
API key authentication
For providers that don’t support device-code OAuth, or when you prefer direct key management, paste an API key directly into config.json:
"providers": {
  "openrouter": { "api_key": "sk-or-v1-..." },
  "anthropic":  { "api_key": "sk-ant-..." },
  "groq":       { "api_key": "gsk_..." }
}
Auth commands
# OpenAI device-code login (ChatGPT Plus/Team/Enterprise)
sciclaw auth login --provider openai

# Anthropic auth (API key or supported oat-token login flow)
sciclaw auth login --provider anthropic

# Check status
sciclaw auth status

# Remove stored credential
sciclaw auth logout --provider openai
Credentials are stored in ~/.picoclaw/auth.json with user-only file permissions. A successful login sets providers.<name>.auth_method in the config (oauth or token). On current Anthropic dev builds, oat-token credentials can be routed through the companion Claude bridge automatically when available.
Workspace Layout
The workspace lives at the path configured in agents.defaults.workspace (default ~/sciclaw).
~/sciclaw/
├── sessions/          # Conversation history
├── memory/            # Long-term memory (MEMORY.md)
├── state/             # Persistent state
├── cron/              # Scheduled jobs database
├── skills/            # Installed skills
├── hooks/             # Hook audit log (hook-events.jsonl)
├── irl/
│   └── commands/      # IRL command execution audit records
├── AGENTS.md          # Agent behavior guide
├── HEARTBEAT.md       # Periodic task prompts
├── HOOKS.md           # Hook policy (plain-language)
├── IDENTITY.md        # sciClaw identity
├── SOUL.md            # Agent values & guardrails
├── TOOLS.md           # Tool descriptions
└── USER.md            # User preferences
Bootstrap templates are versioned at pkg/workspacetpl/templates/workspace/ and also installed to ~/.picoclaw/templates/workspace/ for review and customization.
CLI Reference
| Command | Description |
|---|---|
sciclaw onboard | Initialize config, workspace, and baseline skills |
sciclaw agent -m "..." | Send a one-shot message to the agent |
sciclaw agent | Start interactive chat mode |
sciclaw agent --model <model> | Override model for this invocation |
sciclaw agent --effort <level> | Set reasoning effort level |
sciclaw models list | Show current model and configured providers |
sciclaw models set <model> | Persistently change the default model |
sciclaw models effort <level> | Persistently change the reasoning effort |
sciclaw models status | Show model, provider, auth, and effort |
sciclaw gateway | Start the gateway for chat channels |
sciclaw service <subcommand> | Manage background gateway service (install/start/stop/restart/status/logs) |
sciclaw status | Show current status (includes IRL runtime check) |
sciclaw doctor | Verify deployment: config, tools, skills, auth, gateway, service |
sciclaw doctor --fix | Auto-fix: sync baseline skills, remove legacy names |
sciclaw auth login | Authenticate with a provider |
sciclaw auth status | Show stored credentials |
sciclaw auth logout | Remove a stored credential |
sciclaw skills list | List installed skills |
sciclaw skills install | Install a skill |
sciclaw cron list | List scheduled jobs |
sciclaw cron add | Add a scheduled job |
sciclaw migrate | Migrate from OpenClaw |
The picoclaw command is available as an alias for upstream compatibility.
Agent
The agent command is the primary way to interact with sciClaw.
# One-shot query
sciclaw agent -m "Summarize recent ALS biomarker literature"

# Interactive session
sciclaw agent

# Override model for one invocation (config unchanged)
sciclaw agent --model gpt-5.2 -m "Quick question"

# Set reasoning effort for GPT-5.2 (quality/latency/cost control)
sciclaw agent --effort high -m "Analyze this complex dataset"

# Combine both overrides
sciclaw agent --model gpt-5.2 --effort xhigh -m "Deep analysis"
In interactive mode the agent maintains session context, uses tools (filesystem, shell, web search, spawn), and follows the paired-scientist loop defined in AGENTS.md.
Model Switching
Previously, switching models required editing ~/.picoclaw/config.json by hand and restarting. sciClaw now supports three ways to change models — a one-shot CLI flag, a persistent subcommand, and the config file. In practice, use gpt-5.2 as the primary path and tune reasoning effort per task.
1. Per-invocation override (--model)
The --model flag overrides the model for a single command. Your config file is not changed, so the next invocation returns to your default. Use this when testing a model, when your primary provider is down, or when a specific task needs a different model.
# Quick task with GPT-5.2 (config unchanged)
sciclaw agent --model gpt-5.2 -m "Summarize this CSV"

# Deep analysis with maximum GPT-5.2 effort
sciclaw agent --model gpt-5.2 --effort xhigh -m "Review this manuscript draft"

# Interactive session with a specific model
sciclaw agent --model gpt-5.2
2. Persistent change (sciclaw models)
The models subcommand lets you inspect and change your default model without opening a text editor.
# See current model, resolved provider, auth method, and effort
sciclaw models status

# List all configured providers and their available models
sciclaw models list

# Switch default model (writes to config.json)
sciclaw models set gpt-5.2
# Output: Model changed: <previous> → gpt-5.2
#         Provider: openai
3. Config file
You can also set the model directly in ~/.picoclaw/config.json. This is the same file that sciclaw models set writes to.
{
  "agents": {
    "defaults": {
      "model": "gpt-5.2",
      "reasoning_effort": "high"
    }
  }
}
You can also use the environment variable PICOCLAW_AGENTS_DEFAULTS_MODEL to override the model, and PICOCLAW_AGENTS_DEFAULTS_REASONING_EFFORT for effort.
Provider auto-detection
sciClaw resolves the provider from the model name automatically. You generally do not need to set agents.defaults.provider explicitly.
| Model name contains | Resolved provider |
|---|---|
claude, anthropic/ | Anthropic |
gpt, o1, o3, o4, codex, openai/ | OpenAI |
gemini, google/ | Gemini |
deepseek | DeepSeek |
glm, zhipu | Zhipu |
groq/ | Groq |
openrouter/, meta-llama/ | OpenRouter |
If the provider has an API key or OAuth credential configured, the model is routed to it automatically. If you use OpenRouter, any openrouter/-prefixed model works without additional setup.
Reasoning effort
Reasoning effort controls how deeply gpt-5.2 thinks before answering. This is critical because effort directly controls quality, latency, and cost. Without setting it, the provider default is used.
| Provider | Valid levels | Default when unset |
|---|---|---|
OpenAI (gpt-5.2) | none · minimal · low · medium · high · xhigh | provider default (use medium as practical baseline) |
Per-invocation: use --effort to set effort for a single command.
# High reasoning for a complex analysis
sciclaw agent --effort high -m "Analyze the statistical methods in this paper"

# Maximum reasoning for hardest tasks
sciclaw agent --model gpt-5.2 --effort xhigh -m "Prove this theorem"

# Minimal reasoning for fast, cheap responses
sciclaw agent --effort low -m "What day is it?"
Persistent: save a default effort level so you don't have to pass --effort every time.
# Save effort to config.json
sciclaw models effort high

# Check current setting
sciclaw models status
# Output: Model:            gpt-5.2
#         Provider:         openai
#         Auth:             oauth
# Reasoning Effort: highOpenAI: Sets the reasoning.effort field in the Responses API for gpt-5.2.
low / minimal — Fast, cheap. Good for simple lookups and formatting tasks.
medium / high — Balanced. Good for most research and analysis work.
xhigh — Maximum reasoning depth. Use for proofs, complex debugging, or multi-step scientific reasoning. Significantly slower and more expensive.
Precedence
When multiple sources set the model or effort, the most specific wins:
--model/--effortCLI flags (highest priority, single invocation)- Environment variables (
PICOCLAW_AGENTS_DEFAULTS_MODEL,PICOCLAW_AGENTS_DEFAULTS_REASONING_EFFORT) config.jsonvalues (lowest priority, persistent default)
Gateway
The gateway bridges sciClaw to chat channels (Telegram, Discord, Slack, etc.).
sciclaw gatewayIt reads channel configuration from config.json, starts listeners for each enabled channel, and routes messages through the agent loop. The heartbeat service also starts with the gateway.
Service
Use service to run the gateway in the background and control lifecycle from one command.
On Linux, service install writes an explicit PATH into the systemd user unit so Homebrew tools (for example pubmed and docx-review) and the managed workspace venv (~/sciclaw/.venv/bin) are available when the gateway runs in the background.
# Install + start background gateway
sciclaw service install
sciclaw service start

# Lifecycle
sciclaw service status
sciclaw service restart
sciclaw service stop
sciclaw service logs --lines 200
sciclaw service uninstall
If your shell PATH changes after install, rerun sciclaw service install and sciclaw service restart to refresh the unit environment.
Backend by platform
- macOS: per-user
launchdat~/Library/LaunchAgents/io.sciclaw.gateway.plist - Linux:
systemd --userunit at~/.config/systemd/user/sciclaw-gateway.service - WSL: supported when systemd is enabled in the distro; otherwise run
sciclaw gatewayin a terminal
Skills
# List installed skills
sciclaw skills list

# Install a skill from a directory or URL
sciclaw skills install ./my-skill
Skills extend the agent with specialized knowledge and workflows. Each skill is a directory containing a SKILL.md with name, description, and instructions.
Doctor
The doctor command verifies your entire sciClaw deployment in one shot — config, workspace, auth credentials, companion CLI tools, baseline skills, gateway health, service health, and Homebrew update status.
# Human-readable report
sciclaw doctor

# Machine-readable output
sciclaw doctor --json

# Auto-fix: sync baseline skills, remove legacy skill names
sciclaw doctor --fix
What it checks
| Check | What it verifies |
|---|---|
config | ~/.picoclaw/config.json exists and loads |
workspace | Workspace directory exists |
auth.openai | OAuth status: authenticated, expired, or needs refresh |
auth.anthropic | Anthropic auth status, including Claude OAuth/oat-token bridge state when configured |
docx-review | Word document CLI tool installed |
pubmed-cli | PubMed CLI tool installed (checks both pubmed and pubmed-cli names) |
irl | IRL runtime available |
pandoc | Document converter installed |
rg | ripgrep installed (used by agent tools) |
uv | Python environment manager available (Linux onboarding + fixes) |
python3 | Python 3 available |
python.venv | Workspace venv exists and required Python packages import cleanly |
skills.baseline | Bundled skill pack present and legacy names (docx, pubmed-database) repaired or flagged |
gateway.telegram | Scans logs for Telegram 409 conflicts (multiple bot instances) |
service.backend | Detects service backend (launchd, systemd-user, or unsupported) |
service.installed | Checks whether the background service unit/plist is installed |
service.running | Checks whether the background service is active |
service.enabled | Checks whether the service is enabled on login |
homebrew.sciclaw | Checks if sciClaw is outdated in Homebrew |
The --fix flag
When --fix is passed, doctor applies safe, non-destructive fixes:
- Syncs baseline skills from the bundled Homebrew share directory to your workspace
- Removes legacy skill directories (
docx,pubmed-database) that were replaced bydocx-reviewandpubmed-cli - Creates a
pubmed-clisymlink if onlypubmedis found on PATH - Bootstraps or repairs the workspace Python venv (
~/sciclaw/.venv) on Linux
Exit code 0 = all checks pass. Exit code 1 = at least one error.
Run sciclaw doctor --json to pipe the report into other tools. Each check includes a status field (ok, warn, error, skip) and optional data with install hints.
Paired-Scientist Model
sciClaw acts as a research collaborator, not a general-purpose assistant.
Every interaction follows principles of epistemic humility, reproducibility, and evidence-based reasoning. The agent separates hypotheses from verified findings, cites commands and files for every claim, and escalates when evidence is missing or conflicting.
| Area | What sciClaw provides |
|---|---|
| Framing | Paired-scientist for hypothesis-driven research loops |
| Workspace | Scientific templates (AGENTS, IDENTITY, SOUL, TOOLS, USER) |
| Traceability | Required: evidence capture, provenance logging, hook audit trails |
| Skills | Bundled scientific skills + companion CLI tools |
| Providers | OpenAI, Azure OpenAI, Anthropic, Gemini, OpenRouter, DeepSeek, Groq, Zhipu |
| Reasoning | Per-invocation --effort control for reasoning models |
Research Loop
Each iteration follows a four-phase protocol defined in AGENTS.md:
- Frame — State the question, objective, and hypothesis explicitly.
- Plan — Propose a reproducible execution plan with specific commands and expected outputs.
- Execute — Run tools, capture evidence and logs. Prefer idempotent and reversible operations.
- Record — Update manuscript sections, plan logs, and rendered outputs. Commit together.
Hypotheses are labeled as such until evidence confirms them. Every claim cites the command, file, or tool output that produced it. When evidence is missing or conflicting, the agent escalates rather than guessing.
Baseline Scientific Skills
During sciclaw onboard, bundled skills are installed into ~/sciclaw/skills/ by default:
Research & Literature
- scientific-writing — Manuscript drafting with claim-evidence alignment
- pubmed-cli — PubMed search, article fetch, citation graphs, MeSH lookup (CLI tool)
- biorxiv-database — bioRxiv/medRxiv preprint surveillance
Authoring & Visualization
- quarto-authoring — Loop-driven
.qmdauthoring and rendering - pandoc-docx — Clean Word draft generation from Markdown (bundled NIH template auto-applied)
- imagemagick — Reproducible image preprocessing and conversion workflows
- beautiful-mermaid — Publication-grade diagram workflows
- explainer-site — Technical single-page explainer site generation
Evidence & Provenance
- experiment-provenance — Reproducible experiment evidence capture
- benchmark-logging — Benchmark records with acceptance criteria
Office & Documents
- docx-review — Word documents with tracked changes, comments, semantic diff, and document creation via
--create(v1.3.0+) (CLI tool) - acroform-fill — Typed PDF / AcroForm filling workflows
- pptx — PowerPoint creation and editing
- pdf — PDF creation, merging, splitting, and extraction
- xlsx — Spreadsheet creation, analysis, and conversion
Polish
- humanize-text — Final-pass language polishing for natural tone
Optional Bundled Skill (Manual Install)
- phi-cleaner — Clinical text de-identification helper for PHI-safe sharing workflows (
phi-cleanCLI)
This skill is bundled with sciClaw and available to the agent. Install the companion CLI only if needed:
brew tap drpedapati/tools
brew install drpedapati/tools/phi-cleaner
Office Tool Repo Migration
Office companion tools were transferred from henrybloomingdale/* to drpedapati/*. If you install those tools directly, use the new tap:
brew tap drpedapati/tools
brew install drpedapati/tools/docx-review
brew install drpedapati/tools/pptx-review
brew install drpedapati/tools/xlsx-review
Companion CLI Tools
Two skills are powered by standalone CLI tools that provide native file format support. Install them alongside sciClaw for full functionality:
brew install drpedapati/tools/docx-review   # Word docs with tracked changes (Open XML SDK)
brew install drpedapati/tools/pubmed-cli     # PubMed search & citation graphs
When these CLIs are installed, use them directly in commands. Avoid wrapping them in Python subprocess calls unless a transformation is genuinely required.
Skills Catalog
Additional skills are available from the skills catalog:
sciclaw skills install drpedapati/sciclaw-skills/<skill-name>The skills installer validates all content before writing to disk: size limits (256KB per skill), binary content rejection, YAML frontmatter validation, and SHA-256 provenance logging.
IRL Integration
The Idempotent Research Loop manages the project lifecycle layer that sits above sciClaw's per-loop reproducibility.
sciClaw enforces rigor inside each research loop — evidence capture, manuscript updates, plan logs. But what about the layer above? Creating new projects, organizing them consistently, rediscovering past work, and switching context between studies. That's where IRL comes in.
Why IRL
Without project lifecycle management, common problems accumulate:
- Project sprawl — Research directories pile up with inconsistent names and scattered locations. Finding last month's ERP analysis means grepping through your home directory.
- Boilerplate friction — Every new study starts with the same manual work: creating directories, plan files, config, and manuscript scaffolding before the real work begins.
- Lost context — The agent has no structured way to discover what projects exist or switch between them. You end up pasting paths manually.
- No adoption path — Existing messy folders can't be retroactively brought under management without starting over.
IRL solves these by providing a thin, idempotent project lifecycle layer:
- Auto-named, datestamped projects —
irl init "ERP correlation analysis"creates a consistent260214-erp-correlation-analysis/directory with plans, data, and manuscript scaffolding built in. - Discoverability —
irl list --jsongives the agent a structured view of all managed projects for context-switching without remembering paths. - Adopt existing work —
irl adopt ./messy-folderbrings existing directories under management without starting over. - Templates — Different study types get different scaffolding from day one.
- Safe by default — Operations are idempotent and non-destructive. No accidental overwrites, explicit flags for renames.
How It Works in sciClaw
IRL is bundled as a Homebrew dependency — when you install sciClaw, irl is installed alongside it automatically. There is no sciclaw irl subcommand. Instead, the agent mediates all IRL interactions internally, shelling out to the irl binary and consuming its machine-readable outputs.
Four operations are available through the agent:
| Operation | What the agent does | IRL command |
|---|---|---|
| Create project | Scaffolds a new research project with auto-naming | irl init "purpose" [-t template] |
| Adopt project | Brings an existing directory under IRL management | irl adopt <path> [--rename] |
| Discover projects | Lists all managed projects for context-switching | irl list --json |
| Workspace context | Reads current IRL config and profile | irl config --json + irl profile --json |
You interact with these through natural conversation with the agent. For example:
sciclaw agent -m "Create a new project for ERP correlation analysis"

sciclaw agent -m "What projects do I have?"

sciclaw agent -m "Adopt my old als-biomarker folder as a managed project"
To verify IRL is available:
sciclaw status
# Output includes: IRL Runtime: ✓ /opt/homebrew/bin/irlIRL operations are agent-mediated, not exposed as sciclaw irl ... commands. This keeps the CLI surface minimal and lets the agent handle argument construction, error recovery, and provenance logging automatically.
Provenance
Every IRL command the agent executes is recorded as a timestamped JSON entry in ~/sciclaw/irl/commands/ by default. Each record captures:
- Full command argv and working directory
- Timestamp and IRL version
- stdout, stderr, and exit code
- Parsed payload (for JSON-returning commands)
- Normalized status (
success,failure,partial) - Correlation IDs linking to unified runtime logs
# View recent IRL command records
ls ~/sciclaw/irl/commands/
The command store is append-only audit material — no in-place mutation. This gives you a complete trail of every project created, adopted, or discovered through the agent.
Chat Channels
Talk to sciClaw through your preferred messaging app.
| Channel | Setup Difficulty | Notes |
|---|---|---|
| Telegram | Easy | Recommended. Just a bot token. |
| Discord | Easy | Bot token + message content intent |
| Easy | Outbound via Resend (self-hosted or cloud). No inbound yet. | |
| Slack | Medium | App + bot token |
| Easy | AppID + AppSecret | |
| DingTalk | Medium | Client ID + secret |
| Advanced | Requires bridge |
On current builds, long Discord requests run as background jobs with queue-aware progress cards. Discord also supports real slash commands for /btw (read-only side questions), /skill (explicit skill invocation with autocomplete), and /theme (per-user response style: Clear, Formal, or Brief).
Telegram
1. Create a bot — Open Telegram, search @BotFather, send /newbot, and copy the token.
2. Run the setup wizard
sciclaw channels setup telegramThe wizard prompts for your bot token, then pairs your account by asking you to message the bot once. It will add your user to allow_from automatically (recommended).
Manual config (advanced)
{
  "channels": {
    "telegram": {
      "enabled": true,
      "token": "YOUR_BOT_TOKEN",
      "allow_from": ["YOUR_USER_ID"]
    }
  }
}
3. Run
# Always-on background mode (recommended)
sciclaw service install
sciclaw service start

# Or foreground mode
sciclaw gateway
Discord
- Go to discord.com/developers and create an application.
- In Bot settings, enable MESSAGE CONTENT INTENT.
- Copy the bot token.
- Get your User ID (Developer Mode → right-click avatar → Copy User ID).
- Run the setup wizard:
sciclaw channels setup discordRun
# Always-on background mode (recommended)
sciclaw service install
sciclaw service start

# Or foreground mode
sciclaw gateway- Generate an invite URL via OAuth2 (scopes:
botandapplications.commands; permissions: Send Messages, Read Message History). - Use
sciclaw service statusto confirm the gateway is running in background mode.
Discord rooms now support queue-aware background jobs for long tasks. Exact job controls are exposed through replyable cards, and lightweight side questions can use /btw without interrupting the main workspace job. Explicit skill runs can use /skill with workspace-aware autocomplete.
The /theme slash command lets each user pick a response style: Clear, Formal, or Brief. The preference is stored in the profile system (pkg/profile/) and persists across sessions and channels.
Do not run the same Discord bot token on both the host and a VM gateway simultaneously. Discord delivers each message to every connected client, causing duplicate or racing replies. Run the gateway on one side only, or use separate bot tokens with non-overlapping routed channels. sciclaw doctor detects this conflict automatically.
sciClaw supports outbound email via Resend (self-hosted or cloud). The agent can send email with file attachments using the message tool.
Configure email through the web UI, the TUI Channels tab, or the CLI:
sciclaw channels setup emailOutbound-only for now. Inbound email (receiving and processing incoming messages) is not yet supported.
Collaborative Routing
Give each project its own chat room. Routing maps a Discord or Telegram channel to a specific data folder so the agent only sees that project's files — while still having access to your shared personality, skills, and memory from ~/sciclaw.
@mentions it, so collaborators can discuss freely without triggering responses. DMs always work without a mention.
Recommended: do this in the app (no commands needed)
- Run
sciclaw appand open the Routing tab. - Press [a] to add a mapping and follow the wizard (room, folder, allowed users, label).
- Press [t] to enable routing, then [R] to apply changes live.
- For privacy-sensitive rooms, press [m] and set AI mode to PHI (local).
Advanced CLI (automation only)
sciclaw routing add \
  --channel discord \
  --chat-id 123456789012345678 \
  --workspace /absolute/path/to/project-a \
  --allow 987654321098765432 \
  --label project-a \
  --no-mention

sciclaw routing enable
sciclaw routing validate
sciclaw routing reload

# Debug why a user message did/didn't route
sciclaw routing explain \
  --channel discord \
  --chat-id 123456789012345678 \
  --sender 987654321098765432 \
  --mention
What the routed agent can access:
- Project workspace — the data folder you mapped (read/write)
- Shared workspace (
~/sciclaw) — your personality files (AGENTS.md,SOUL.md, etc.) and all installed skills - Isolated sessions — conversation history, memory, and state are kept per-workspace so projects never cross-contaminate
Session keys are namespaced as <channel>:<chat_id>@<workspace_hash> to isolate context across workspaces.
Addons
Optional capabilities installed separately from the core binary.
Addons extend sciClaw with heavyweight features that do not belong in the main binary: browser desktops, notebook servers, or custom integrations. Each addon is a standalone git repo containing a manifest, a sidecar binary, and optional install/upgrade scripts.
The gateway reconciler automatically spawns sidecar processes for enabled addons on startup and converges live state against the on-disk registry every 10 seconds. CLI changes (install, enable, disable) take effect without a gateway restart.
The web UI sidebar dynamically injects a tab for each enabled addon. Clicking a tab loads the addon's React UI in an iframe, proxied over the addon's Unix socket.
CLI Commands
# Install an addon from a git URL at a specific version
sciclaw addon install <url> --version v0.1.0

# Lifecycle
sciclaw addon enable <name>
sciclaw addon disable <name>
sciclaw addon uninstall <name>
sciclaw addon upgrade <name> --version v0.2.0

# Inspection
sciclaw addon list
sciclaw addon status <name>
sciclaw addon verify <name>
sciclaw addon sbom <name>

# Recovery
sciclaw addon rollback <name>
Upgrade failures automatically roll back the working tree. Concurrent installs are serialized with file locks.
Reference Addons
Two reference addons ship under the sciclaw org (private repos):
| Addon | What it provides |
|---|---|
| sciclaw-addon-webtop | Per-user Ubuntu XFCE browser desktops via linuxserver/webtop and Docker. Shared workspace mounts. React admin panel with identity dropdown. |
| sciclaw-addon-jupyter | Per-user Jupyter Lab with token auth. Tokens rotate on restart. One-shot URL display with explicit copy/open actions. React admin panel. |
Both addons share the same workspace and user identity as the chat channels. Addon UIs source user dropdowns from the GET /api/core/users endpoint instead of accepting freeform names.
Addon Security
Two security review passes closed 13 findings. Key hardening measures:
- Mount validation against an allowlist prevents Docker volume escape.
- Proxy path allowlisting scopes addon UIs to their declared routes.
- Socket permissions are enforced at 0600 so only the owning process can connect.
- Docker flag injection is blocked via
--terminators. - Hook payloads are stripped of per-chat ACLs before delivery to addon sidecars.
- Symlink escape is blocked in web UI file handlers.
User Identity Endpoint
GET /api/core/users returns the union of profile store entries and routing rule allowed senders. Addon UIs use this endpoint to populate identity dropdowns instead of freeform text input, so the same user list is consistent across the web UI and all addons.
PHI Mode (Local Inference)
Run LLM inference locally via Ollama. No data leaves the machine — ideal for protected health information, air-gapped environments, or cost savings.
New to local mode? Start with the visual PHI Mode guide.
PHI Mode routes all LLM calls to a local Ollama backend instead of cloud providers. It uses the Qwen 3.5 model family, which supports tool calling and runs efficiently on consumer hardware.
CPU-only local mode is supported, but it is usually the slower fallback lane rather than the full interactive experience you get on Apple Silicon or GPU-backed machines.
You can run PHI mode globally for everything, or apply it only to selected channels via Per-Room PHI Routing.
Setup
Install Ollama first, then run setup:
# One-time setup: detect hardware, pull model, verify
sciclaw modes phi-setup

# Confirm it's active
sciclaw modes status
Setup automatically detects your hardware, selects an appropriate model, pulls it via Ollama, verifies it responds, and persists the configuration. The whole process takes 2–5 minutes depending on download speed.
The resulting config looks like:
{
  "agents": {
    "defaults": {
      "mode": "phi",
      "local_backend": "ollama",
      "local_model": "qwen3.5:4b",
      "local_preset": "balanced"
    }
  }
}
Override via environment variables: PICOCLAW_AGENTS_DEFAULTS_MODE=phi, PICOCLAW_AGENTS_DEFAULTS_LOCAL_BACKEND=ollama, etc.
Per-Room PHI Routing (Mix Cloud + Local)
You can keep everyday channels on cloud models and route only sensitive channels to local PHI mode. Think of this as a room-level override.
| Goal | Best Choice |
|---|---|
| Everything local on this machine | Set global mode to PHI |
| Only specific channels local/private | Keep global cloud/default and set those channel mappings to PHI |
TUI steps (recommended)
- Run
sciclaw modes phi-setuponce to install and validate your local runtime. - Open
sciclaw appand go to Routing. - Select a room mapping, press [m], set mode to phi, then confirm backend/model.
- Press [R] to apply live. No restart needed.
To move a room back to inherited/default behavior, open that mapping with [m], set mode to default, then press [R] again.
Hardware Profiles
Setup matches your hardware to a profile and selects a model. Three presets control the size/speed trade-off: speed (2B), balanced (4B, default), and quality (9B).
| Profile | Requirements | Balanced Model |
|---|---|---|
| Apple Silicon 16GB+ | macOS arm64, 16GB+ RAM | qwen3.5:4b |
| NVIDIA 12GB+ | Linux/Windows, 12GB+ VRAM | qwen3.5:4b |
| NVIDIA 6–11GB | Linux/Windows, 6–11GB VRAM | qwen3.5:4b |
| CPU-only 16GB+ | Any OS, 16GB+ RAM, no GPU | qwen3.5:4b |
| CPU-only <16GB | Any OS, 6–15GB RAM, no GPU | qwen3.5:2b |
Commands
# Show current mode, backend, model, hardware
sciclaw modes status

# Switch to local inference
sciclaw modes set phi

# Switch back to cloud
sciclaw modes set cloud

# Switch to VM mode
sciclaw modes set vm

# Re-run setup (e.g., after hardware change)
sciclaw modes phi-setup

# Detailed backend health check
sciclaw modes phi-status
Switching between modes is instant. PHI mode configuration is preserved when you switch to cloud, so switching back doesn't require re-downloading the model.
Advanced: you can also set PHI at the channel level with routing set-runtime, but most users should use the Routing tab ([m] then [R]).
Troubleshooting
- “ollama is not installed” — Download from ollama.com and install before running setup.
- “ollama is installed but not running” — macOS: open the Ollama app. Linux:
systemctl start ollama. Windows: start the Ollama service. - Slow first response — The model loads into memory on first use. Subsequent responses are much faster.
- Room set to PHI but no answer — check
sciclaw modes phi-status, confirm that mapping shows AI modephi, then press [R] in Routing to apply. - Tool calling quality — Qwen 3.5 supports tool calling, but results may vary compared to cloud models. If tools behave unexpectedly, try the quality preset (9B) or switch to cloud for complex tasks.
- No matching hardware profile — PHI mode requires at least 6GB RAM or 6GB VRAM (depending on profile). Machines below this threshold should use cloud mode.
MLX support is planned for Apple Silicon and will be preferred when implemented. Currently all platforms use Ollama.
ctxclaw
A standalone prompt-context optimizer that keeps your agent’s context window clean and efficient.
Why it exists
Long-running sciClaw sessions — multi-hour literature reviews, document drafting, data analysis — accumulate stale history. A 2000-line file read from 40 turns ago stays in the prompt, and every new turn pays for it. Eventually the agent either hits the context window limit or wastes most of its budget replaying content nobody needs.
ctxclaw is a separate Go binary that solves this narrow problem. It is not an agent, not a memory store, and not a workflow engine. It sits between the agent runtime and the model call, and it makes the prompt smaller.
Installation
ctxclaw is installed automatically as a sciClaw dependency. To install or update it standalone:
brew install drpedapati/tap/ctxclaw
ctxclaw version
How It Works
ctxclaw reads a structured prompt envelope from stdin and emits an optimized version on stdout:
# Basic pipeline
sciclaw prompt export --session <key> | ctxclaw optimize | sciclaw prompt preview
What it does during optimization:
- Archives oversized tool outputs — large file reads, web fetches, and search results from old turns are moved to archive files instead of being replayed in the live prompt
- Checkpoint summaries — older conversation history is replaced with a deterministic summary, preserving key decisions and context without carrying full verbatim content
- Preserves the tail — recent, structurally valid conversation turns are kept intact so the agent has full context for the current task
The key design principle: context management is separated from agent behavior. The agent runtime continues doing agent work. ctxclaw decides what old context should stay live. This separation makes both easier to test, benchmark, and maintain.
Prompt Inspection
Before optimizing, you often want to understand where your tokens are going. The sciclaw prompt inspect command gives you a full breakdown:
sciclaw prompt inspect --session <session-key>

# Example output:
Session: discord:1476333670787711140@38b972148867
Workspace: /home/ernie/sciclaw/nihc3i-dave

System prompt
  total: 8432 chars (~2108 tokens)
  identity: 1205 chars
  bootstrap total: 4812 chars
    - AGENTS.md: 1900 chars (~475 tokens)
    - TOOLS.md: 3613 chars (~903 tokens)
  skills summary: 892 chars
  memory: 487 chars (~122 tokens)

History before latest user turn
  messages: 24
  total: 31204 chars (~7801 tokens)
    - tool: 12 msgs, 22108 chars (~5527 tokens)
    - assistant: 8 msgs, 6420 chars (~1605 tokens)
    - user: 4 msgs, 2676 chars (~669 tokens)

Top contributors
  - tool schemas: 14200 chars (~3550 tokens)
  - history: 31204 chars (~7801 tokens)
  - bootstrap files: 4812 chars (~1203 tokens)
This tells you exactly which parts of the prompt are consuming the most tokens. Common findings:
- Tool outputs dominating history — a few large
read_fileorweb_searchresults can account for 70%+ of the history budget - Tool schemas overhead — 32 registered tools can consume 3500+ tokens just for their JSON schemas
- Bootstrap file drift — customized TOOLS.md or AGENTS.md may be larger than the release template
Use the --json flag for machine-readable output:
sciclaw prompt inspect --session <key> --jsonHooks
Lifecycle hooks let you capture context, enforce policy, and build an audit trail at every stage of the agent loop.
sciClaw fires hooks at seven points in the agent lifecycle. Each hook receives an immutable snapshot of the current turn — session, channel, tool call, LLM response — and returns a result that is written to the audit log.
Two built-in handlers ship by default:
- policy — Reads
HOOKS.mdandhooks.yamlfrom your workspace, enables/disables events, and injects per-event instructions. - provenance — Records normalized event metadata (turn ID, session, tool name) for reproducibility.
Events
| Event | Fires when |
|---|---|
before_turn | A new user message arrives, before the agent loop begins |
after_turn | The agent loop finishes a turn |
before_llm | Just before calling the LLM provider |
after_llm | Immediately after the LLM responds |
before_tool | Before executing a tool call (shell, file, web, etc.) |
after_tool | After a tool call completes |
on_error | When an error occurs anywhere in the loop |
Each handler receives a Context snapshot containing the turn ID, session key, channel, model, user message, tool name/args/result, LLM response summary, and error message as applicable.
Policy
Hook behavior is configured through workspace files. The policy loader checks two sources in order:
HOOKS.md— Plain-language instructions per event, written so non-technical users can maintain them.hooks.yaml— Structured policy with per-event enable/disable, verbosity levels, capture fields, and redaction keys.
Example HOOKS.md (installed during sciclaw onboard):
## before_turn
- Capture project context needed for reproducibility.

## after_turn
- Summarize completed actions and unresolved risks.
- Record what should be updated in manuscript and logs.

## before_tool
- Record the intent of the tool call and key parameters (redacting secrets).

## after_tool
- Record tool outcomes and where artifacts were written.

## on_error
- Capture failure context, likely cause, and the next recovery step.
The default policy automatically redacts sensitive fields: api_key, token, secret, authorization, and password.
Edit HOOKS.md in your workspace to customize what the agent captures at each lifecycle event. Changes take effect on the next turn — no restart required.
Audit Log
Every hook execution is appended to a JSONL audit log at hooks/hook-events.jsonl inside your workspace. Each entry records:
- Turn ID, event name, and handler name
- Status (
okorerror) and duration in milliseconds - Session key, channel, and chat ID
- Handler-specific metadata and any error messages
# View recent hook events
tail -5 ~/sciclaw/hooks/hook-events.jsonl | jq .
The audit log is designed for reproducibility — every claim the agent makes can be traced back to the tool calls and LLM responses that produced it.
Heartbeat
Automatic periodic tasks, checked every 30 minutes (disabled by default).
Create a HEARTBEAT.md file in your workspace with tasks the agent should execute periodically:
# Periodic Tasks

## Quick Tasks (respond directly)
- Report current time

## Long Tasks (use spawn for async)
- Search the web for AI news and summarize
- Check email and report important messages
For long-running work, the agent uses the spawn tool to create async subagents that run independently and communicate results via the message tool.
The message tool also supports outbound file attachments on Discord/Telegram (for example sending generated .docx and .pdf files back to the user).
{
  "heartbeat": {
    "enabled": false,
    "interval": 30
  }
}
Override via environment variables: PICOCLAW_HEARTBEAT_ENABLED=false or PICOCLAW_HEARTBEAT_INTERVAL=60.
Scheduled Tasks
sciClaw supports cron-style scheduled tasks for reminders and recurring jobs.
- One-time reminders — "Remind me in 10 minutes"
- Recurring tasks — "Remind me every 2 hours"
- Cron expressions — "Remind me at 9am daily"
sciclaw cron list
sciclaw cron add "Check email" --every 2h
Jobs are stored in ~/sciclaw/cron/ by default and processed automatically by the gateway.
Docker
Run sciClaw in Docker without installing anything locally.
# Clone and configure
git clone https://github.com/drpedapati/sciclaw.git
cd sciclaw
cp config/config.example.json config/config.json

# Start gateway mode
docker compose --profile gateway up -d

# Or run agent one-shot
docker compose run --rm sciclaw-agent -m "Hello"

# Check logs
docker compose logs -f sciclaw-gateway

# Stop
docker compose --profile gateway down
The Docker image uses a multi-stage build (Go builder → Debian slim) and ships with baseline skills plus core scientific tooling pre-installed (python3, uv, rg, magick, pandoc, quarto, docx-review, pubmed-cli, irl).